
Screen capture, screenshot—whatever you call it, this is a distinctive way of snapping a picture of whatever is on your computer screen.
It’s super useful for adding images to presentations or sharing conversations with coworkers. Whether you need to save something important or just want to share what you’re seeing, screenshots are the way to go.
And guess what?
Key Takeaways:
- Windows 11: Press Windows + Shift + S for a selected area, or Windows + PrtScn to save the whole screen.
- Windows 10: Use Windows + Shift + S, PrtScn, Alt + PrtScn, or Windows + PrtScn. Snip & Sketch and Snipping Tool are also available depending on your installation.
- Windows 7: Use PrtScn, Alt + PrtScn, or Snipping Tool. Paste clipboard captures into Paint to save them.
- Can’t find the Print Screen key? Some laptops require Fn + PrtScn or a manufacturer-specific key combination.
- Choose your version: Use the Windows 11, Windows 10, or Windows 7 buttons below to jump straight to the instructions.
There are several easy ways to take a screenshot on Windows 11, Windows 10, or Windows 7.
Want to capture the whole screen? Or maybe just a part of it? Prefer using keyboard shortcuts or an app? No problem!
Let’s look at the methods available for each version of Windows.
Whether you’re using a Dell, HP, Acer, ASUS, or another laptop, select your Windows version below and follow the relevant steps.
Which Windows Version Are You Using?
Select your Windows version below to jump directly to the screenshot instructions you need.
How to Take Screenshots on Windows 11
Take a screenshot of the entire screen:
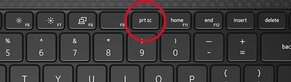
Unlike Macs, the easiest way to take a screenshot of your whole screen is to press the ‘PrtSc’ key on your keyboard.
When you press this key, the screenshot is copied to your clipboard. You won’t get any notification, but you can see the screenshot by pasting it (Ctrl-V) into an app like Paint, Microsoft Word, or even an email.
Take a screenshot using Windows key:
Alternatively, to capture a screenshot in Windows 11 is much easier by simply pressing the Windows key + print screen button together.
This shortcut key will take an instant screenshot of your screen.
- Step 1: Press both the Print Screen and Window buttons simultaneously.
- Step 2: After that, your screen will become dim for a while before switching back to normal brightness, meaning that a screenshot had been taken successfully.
- Step 3: On Windows 11, the screenshot will be automatically saved as an image in the Screenshots folder, which is inside the main Pictures folder.
Take a screenshot of only a portion of the screen
If you only want a screenshot of part of your screen, Windows 11 has a handy option for that.
Press Win + Shift + S, and your screen will dim with a small Snipping Tool menu at the top.
This menu lets you:
- Rectangular Snip: which allows you to select a rectangular area to capture
- Freeform Snip: which allows you to draw an irregular shape to capture. The area around your shape will be black
- With Window Snip, you can capture a specific application window
- Full-screen Snip: Capture your whole screen (like the Print Screen key)
The screenshot goes to your clipboard, so you can paste it (Ctrl-V) anywhere to view it.
Here is how it looks like:
When you press Windows + Shift + S. It gets dim and there are four options like this:

When you select the portion you want to save, it looks like this:

As you select the portion, it’s automatically saved. So, it’s a great tool to save an important part of the screen or image.
Secondly, if you click the Snipping Tool preview that shows up at the bottom of the screen, you can edit the screenshot (crop, rotate, etc.) and save it to your computer.


Use the snipping tool:
The Snipping Tool is a part of Windows 11 that helps you take high quality pictures of different parts of your screen. Here’s how you can use it:
- Press the Windows key to open the Start menu.
- Type “Snipping Tool” and click on the app to open it.
- Click on “New” inside the Snipping Tool.
- Choose the type of snip you want: “Rectangular Snip,” “Freeform Snip,” “Window Snip,” or “Full-screen Snip.”
- Use your mouse to select the part of the screen you want to capture.
- The picture you capture will appear in the Snipping Tool editor. You can add notes or make changes to it.
- Click on “File” and then choose “Save As” to save your picture wherever you want.
When you need to capture specific parts of your screen or add notes to your pictures, the Snipping Tool is really useful. The Windows 11 Snipping Tool also provides capture and editing features previously associated with Snip & Sketch.
Take a screenshot by using snip and sketch:
Snip & Sketch was introduced for Windows 10, and its features are now incorporated into the Windows 11 Snipping Tool. It’s useful for taking pictures of your screen and adding notes to them. Here’s how you can use it:
- To open the Snip & Sketch tool, press the Windows key along with Shift and S.
- Click and drag your mouse to select the part of the screen you want to capture.
- The picture you capture is copied to the clipboard; you can open the preview and save it if automatic saving is not enabled.
- A message will appear at the bottom of your screen, allowing you to open the picture in Snip & Sketch to add notes.
- In Snip & Sketch, you can draw, highlight, or add text to your picture.
- When you’re done, click on the save icon or press Ctrl + S to save your picture.
With Snip & Sketch, taking, marking, and saving pictures of your screen in Windows 11 is easy and fast. Many Windows users like it because it’s simple to use and has lots of useful features.
Use Xbox Game Bar:
The Xbox Game Bar helps you take screenshots and record gameplay on your computer if you’re using Windows 11.
Here’s how to use it:
- In Windows 11, press the “Windows key + G” on your keyboard. This will bring up three small windows stacked on top of each other.
- In the small window that appears, look for four buttons at the top-left corner. The second one from the right is for taking screenshots, and the third one is for recording your gameplay.
However, there’s a catch with taking screenshots this way. You can only capture what’s on your screen at the moment. The camera icon in the game bar works like pressing “Windows + Alt + PrntScr” on your keyboard.
Every screenshot you take in this way will be automatically stored in the Videos -> Captures folder.Then you can edit or add notes to them using any image editor you like.
How to Take Screenshots on Windows 10
Using Windows 10? You have several ways to take a screenshot, and most of them don’t require installing another application. Let’s start with the quickest options.
1. Capture the entire screen: Press PrtScn to copy the screen to your clipboard. Open Paint, Word, or another app, press Ctrl + V, and save the picture if needed. On some laptops, you may need Fn + PrtScn.
2. Save the screenshot automatically: Press Windows + PrtScn. Windows 10 saves the image in Pictures > Screenshots. If you’re using a laptop, your keyboard may require the Fn key too.
3. Capture the active window: Press Alt + PrtScn. This copies the currently selected window instead of your entire desktop. Paste it into Paint or another program to save it.
4. Capture a selected area: Press Windows + Shift + S. The screen snipping toolbar opens, allowing you to choose a rectangular, freeform, window, or full-screen capture. The screenshot is copied to the clipboard; open its notification to annotate and save it.
5. Use Snip & Sketch or Snipping Tool: Search for either tool from Start, depending on the version and updates installed on your Windows 10 computer. You can choose an area, capture it, and save the screenshot.
6. Capture a game: If Xbox Game Bar is available and enabled, press Windows + G and use the Capture widget. Screenshots are normally saved in Videos > Captures.
One more thing: Windows 10 reached the end of its standard support on October 14, 2025. These screenshot methods still work, but for security, consider moving to a supported Windows version if your computer allows it.
How to Take Screenshots on Windows 7
Still using Windows 7? No worries. Some screenshot methods work much the same way as they do in Windows 11, but a few newer shortcuts and tools aren’t available.
Method 1: Press PrtScn. This captures the entire screen to the clipboard. You won’t necessarily see a notification. Open Paint from Start > All Programs > Accessories, press Ctrl + V, and save the image.
Method 2: Press Alt + PrtScn. This copies only the active window. Paste it into Paint, Word, or another application that accepts images, then save it if needed.
Method 3: Use the Snipping Tool. Open Start, search for Snipping Tool, choose the type of capture, select the area you want, and save the result. This is particularly useful when you don’t want to capture the entire screen.
What about Windows + PrtScn? Unlike Windows 11, Windows 7 does not have the built-in Windows + PrtScn shortcut that automatically saves a screenshot to Pictures > Screenshots. Use Paint or Snipping Tool to save your capture instead.
If the Print Screen key doesn’t work, check whether your laptop requires the Fn key. Some keyboards combine Print Screen with another key, and the exact combination depends on the model.
Windows 7 vs. Windows 10 vs. Windows 11 Screenshot Shortcuts
| Screenshot method | Windows 7 | Windows 10 | Windows 11 |
|---|---|---|---|
| PrtScn | Copies full screen to clipboard | Copies full screen to clipboard | Copies full screen or opens screen snipping, depending on settings |
| Alt + PrtScn | Copies active window | Copies active window | Copies active window |
| Windows + PrtScn | Not a built-in auto-save shortcut | Saves full-screen image to Pictures > Screenshots | Saves full-screen image to Pictures > Screenshots |
| Windows + Shift + S | Not built in | Opens screen snipping | Opens screen snipping |
| Snipping Tool | Available; save manually | Available; Snip & Sketch may also be present | Available with editing and saving options |
Third party Apps to Take Screenshots in Windows 11:
Windows has many apps that you can use to take screenshots, but these are the best for Windows 11:
Screenpresso:
Screenpresso is one of the best screen capturing apps for windows. It has several editing features. Some options are free while others requires buying them. On Windows 11, Screenpresso will enable you to:
- Take pictures of scrolling pages and individual screens
- Edit snapshots with numerous tools
- Highlight or blur parts of a picture
- Record video and more
Lightshot:
Lightshot is a tool you can use on different devices to take pictures of what’s on your screen. It doesn’t use up too much of your device’s power. It comes with a simple editing feature, so it’s easy to use. It’s a good option for taking pictures on Windows 11. With Lightshot, you can:
- Capture and edit screenshots for free
- Quickly share screenshots online
- Customize hotkeys for taking screenshots
Greenshot:
Greenshot is an open-source screenshot software for Windows that can be downloaded for free. This means that anyone, from programmers to writers and team leaders, can benefit from using it. In Windows 11, having Greenshot will allow you to:
- Capture the entire screen, a selected area, the current window, or scrolling pages
- Highlight or blur parts of the screenshot
- Export screenshots to email, printer, or Microsoft Paint
How to Take a Screenshot on Windows 11 Laptops (ASUS, ACER, DELL, HP):
All these laptops have the same easy methods as i have mentioned above for taking screenshots, as long as they have Windows 11. Whether you are using an ASUS, ACER, DELL or HP laptop it is just as simple as pressing few keys.
To capture the whole screen, just hit Print Screen or Fn + Print Screen, depending on your keyboard setup.
If you want to snap the active window, press Alt + Print Screen. And for capturing a specific area, all you need to do is press Windows Key + Shift + S. Just like that, no complications! These tricks work like a charm on all these laptops!
